My streak of good luck has continued! I've won two more giveaways. First, I won a set of handmade Amy Butler tags from Kelly at
I Have A Notion. Then, I won some half-yard cuts of my current favorite fabric line, "Good Folks" by Anna Maria Horner, from new quilt-along-er Joan at
Wishes, True and Kind. Thanks so much, Kelly & Joan!
Wow, at this rate I should really go out and buy a lottery ticket.
And now, back to business : ) Welcome back for the third block variation in our quilt along. This version is our wonky square-in-square block. We will largely be using the steps from
our first block variation, combined with some of the techniques introduced in
the second. We will be constructing this block in much the same way that we made our
wonky log cabin block, except that we will (mostly!) use the same fabric for each round of 4 logs. Make sense?
Since you are all now seasoned pros at wonky block making, I'm going to move a bit more quickly. Besides, I can tell by
our Flickr pool that many of you have already figured this block out on your own!
First, as always, begin with a center square for your block. I started with a nice, fat 3" square this time, for no reason other than that I wanted to feature that rose design.

As with the other blocks, I shaved a bit off of some of the sides to start giving the block some of its interesting angles. This time, I cut on 3 of the sides. As usual, you can skew anywhere from 0 to 4 of the sides ... and as severely or as subtly as you'd like. Try it out a few different ways and see what feels the best for you.

Let me stop for a sec and point out that nifty little ruler that you see in the picture above. I know I mentioned at the start of this quilt along that the only tool I'd recommend is the 12.5" ruler. Well, a strong second suggestion would be a little ruler like this one. It's much more convenient to make small trims with it than with my larger, bulkier rulers.
Next, plan your first round of logs. When I make these blocks, I usually like to make my first log from a different fabric than the next three. I don't know why, but I suspect it's because I saw Denyse Schmidt do something like that in her blocks. Of course, this is completely optional ... but consider adding a "random" log somewhere in your block, if not in your first round than maybe in a later round. Try it out in the same pattern as your other logs but in a different color, or from a different pattern in the same color. It'll be cool ... I promise.

Sew, press, and trim, as you might expect.

Here's the block with its first set of logs attached:

You might notice that I added thinner strips on the bottom and right side, and wider strips on the top and left. Alternating your strip sizes is a nice way to offset the block's center and keep that middle square moving throughout the block. This is a great time to point you to a wonderful post about some tricks to making effective wonky blocks ... check out
Jenny's post on her blempgorf blog.
You know what comes next ...

Wonk!
I went pretty severe on this one ... by my standards, anyway.
Proceed to adding your second set of logs. You can see here that I followed Jenny's advice and used thinner strips on bottom and right side this time, to balance the block out and move the center back closer to ... well, to the center:

With another round of logs attached, it is again time to make some cuts and give your block some more interesting angles:

On to your third round of logs.
In this round, I decided to use a technique that I introduced in the
quarter log cabin tutorial -- the pieced log:

And here's my block so far with everything sewn, pressed and trimmed:

Now is a good time to do a progress-check, using your 12.5" ruler as your guide:

So here's what I determined about my block at this point: it's looking far too rectangular, taller than it is wide. Keep an eye out for some common pitfalls, like blocks becoming rectangular, a corner becoming way too pointy, the center sqaure being pushed too far to one side, or the block taking on the shape of a
parallelogram.
Not a problem, I'll just make some more trims:

Much better.
Time for your fourth round of logs. Here's another technique you may (or may not) want to try. Square-in-square blocks are built off the premise of using the same fabric for each round of logs. But who said you always have to follow that rule? Isn't
the first rule of wonky block making that there are no rules?
For my block, I decided to use one fabric for the bottom (first) log, switch to a different pattern for the next two logs, and finish out the round with the same fabric as the first.
After sewing, pressing, and trimming, it's time for another check:

Errrrr ... and now you know why I recommend this step. First, it helped me to see that I should be good to go with just one more round of logs. (And, as I mentioned in my last post, you don't always have to use 3" strips for your outer borders. My ruler helped me to see that I can use 2" and 2.5" strips for my outer borders, and still have plenty of room to trim). Also, in this instance, it helped me see that my bottom left corner was sticking
way too far out.
Time for some more trims. I trimmed up the bottom and left side to reduce the angle of that corner, and help to keep it closer to square:

Did you notice me practicing one of my earlier tips, too? Look at the left side of my block. See how the yellow log went from skinny at the top to wider at the bottom? I wanted my trim of the pink rose log to offset that angle and balance it out a bit, so I cut that strip to be wider at the top and skinny at the bottom.
How's it looking now?:

Another judgment call. Not enough wonk -- it's looking a little too square. A little more off of the top and right side. You can see the skinny/wide trick again on the right:

Add the first two strips of your final round of logs. You can see that I started improvising from my scrap pile, since I was running short of that outer border fabric. I pieced my first (bottom) log with some coordinating prints:

After another gut check, I added the third and fourth logs. Here's my block before my final trim:

To be frank, I wasn't too thrilled with how that bottom border turned out, so I leveraged my final cut to trim that log down:

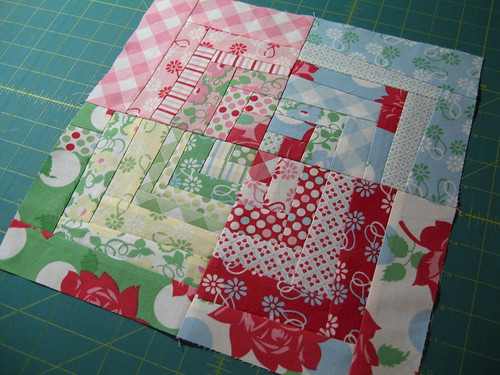
And voila! There you have it, the wonky square-in-square block.

If I could change anything about this block, I think I would have added a solid or two. I think, moreso than the other three block variations, this block design really pops with the use of some solids -- I suspect it's because it makes it easier for your eye to discern the square-in-square shape. That seems to get lost a bit when using all prints.
Well, every block can't be a star ... some have to play supporting roles in your quilt, too!

As always, I'd love to hear your feedback. I can't wait to see some of your wonky square-in-square blocks pop up in
the Flickr pool. One more block to go, and then it's up to you to figure out how you want to use them in your final quilt design.
Have fun!