Hello, and welcome to everyone participating in Jackie's
Blogger's Block of the Month quilt-along! I've really enjoyed seeing the designs that have been posted so far, as well as all of the fantastic blocks filling the quilt-along's
Flickr pool.
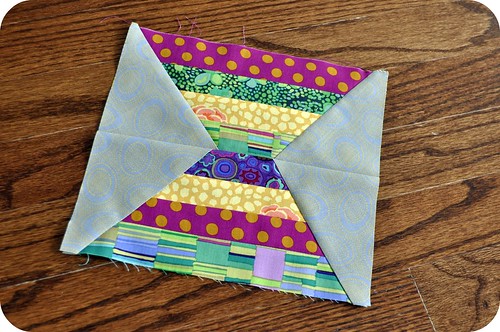
I'm excited to bring you January's block, the 5th block in the program. Because it looks like an hourglass, I call it the Sands of Time block. Finishing out at 8" square (8.5" unfinished), it's a quick & easy block to make -- something I thought you'd all appreciate as you catch up from the holiday rush.
Ready to get started? Here we go ... !
First, cut 8 - 1.5" x 8.5" strips from assorted prints. You don't necessarily need 8 different prints -- you can see that I used 5 prints here, and just repeated 3 of them.
Sew the strips together into two sets of 4 strips each. This will yield 2 rectangles, each measuring 4.5" x 8.5".
Find the spot along the bottom edge of your first rectangle that is 3" in from the left hand side. Mark it lightly with a pencil. Using your rotary cutter and straight-edge ruler, make a cut from the top left corner of the rectangle to your pencil mark. Repeat on the right side of your rectangle, making a slice from the top right corner to a mark along the bottom edge that measures 3" from the right side.
This sounds really confusing, but just take a look at the picture below. It's way easy, and only sounds complicated.
As you can see in the photo, you'll do the same steps with your second rectangle, but this time you'll be measuring in 3" from the left and right sides along the
top edge of the rectangle, and cutting from the bottom corners.
See? It's actually very easy.
OK, from a background fabric, cut 4 rectangles measuring approximately 4" x 6". You'll see in a moment why it's not important that the measurement is exact, as long as you have enough surface area to square up the block later. If (unlike me) you're obsessive about not wasting fabric, trial & error should help you determine the exact measurement that you'll need to minimize waste.
Place your rectangle along one edge of your trapezoid as shown below, eyeballing that you have enough overhang on the top and bottom edges to allow this rectangle to "replace" the triangle you just sliced off. Again, this sounds more complicated than it really is! The pictures help ...
With right sides together, sew the rectangle to one side of the trapezoid, and press open.
With your ruler and your rotary cutter, and using the top and bottom edges of your trapezoid as a guide, trim the edges so that the height of your pieced block is back to 4.5".
Repeat these steps for the remaining 3 sides of your trapezoids. You should now have two strange looking pieced shapes that look similar to the ones in the image below:
Line up the two smallest strips and, with right sides together, sew the two pieces together. Press open. The height of the pieced block should now measure 8.5".
Now all you have to do is trim the width of the block down to 8.5". Be careful to center your block as best you can. The block should now measure 8.5" square.
And there you have it -- my scrappy Sands of Time block! I hope you enjoy making this block, and I can't wait to see all of your color and print variations. If you make a Sands of Time block, be sure to add it to the
Blogger's BOM Flickr group. And, of course, I'd love it if you also added it to my
Quilt Dad is my Homeboy group.

Big thanks to
Jackie for asking me to be a part of this wonderful quilt-along. As a reminder, here is the full schedule of the other amazingly talented bloggers taking part in the Blogger's BOM quilt-along:
October - Jackie Kunkel - Canton Village Quilt Works


