Thank you all so much for the wonderful feedback you've been leaving me on my last tutorial. I am so glad to hear that I've been able to help so many new quilters (and even some older, but new-to-wonky quilters!) get started on this new project. I've even heard from some of the more experienced quilters that I was able to offer a few new tips, which is great. It's been so much fun seeing all of the blocks you've been creating, and I really hope you're enjoying yourself in the process.
Before moving on to today's tutorial, I wanted to take care of a few pieces of business.
There are, however, two points of clarification that I want to call out here.
You can also begin to introduce pieced strips to make longer usable strips out of too-short ones, a technique I'll be introducing in this post.
Second, I also want to comment on fabric requirements for the quilt along. Originally, I had recommended a minimum of 16 fat quarters to make a 25-block quilt. Admittedly, this was purely an estimate based on what I thought was some logical reasoning. nanotchka made a full quilt based on my last tutorial over the last few days and reported back to me that it took nearly 26 fat quarters to make her entire quilt, with very few scraps left over. It looks like I may have underestimated the amount of fabric that the quilt would take. So, if you're planning on making the full quilt, you may want to think about adding a few more fabrics into the mix. Of course, you can always wait to see how far you get before you start to run short, but I wanted you to be aware for planning purposes. Sorry about that!
Finally, I made the block from the first tutorial into an adorable little quilted pillow for my giveaway winner. Let me tell you, I had a hard time convincing Mrs. Quilt Dad that this was already promised to one of my blog readers!
I tried something new on this one: a quick binding sewn on to the edge of the back flap. I think it adds a nice little detail to the back of the pillow!
The random number generator picked #46, and the winner of the pillow is Nichole, who said:
Thanks for the great step by step with photos; it really helps make everything clear. I am working on some Christmas/winter wonky blocks - will post pics tomorrow. my flickr is partridgepeartree. Thanks for the giveaway, John!
Congrats, Nichole! I'll Flickrmail you for your mailing information.
OK, are your ready for the second block variation? It's what I call the "wonky quarter log cabin" block because ... well, because it's basically like one quarter of a full log cabin block! I think this has become my favorite of the four variations, because of its versatility. At the end of the post, I'll show some different ways to lay this block out for some really cool design effects.
I am confident that as we move from block to block, you'll start to get the hang of the technique (which is mostly the same, regardless of the block variation) and won't really need much of my explanation..
For this block, I started with a 2" block, cut from one of my 2" strips. Again, this starting block can be any size of your choosing. 2" sounded like a good place to start for me:

I gave a little subtle wonk to two sides of the center square by using my ruler and rotary cutter to cut some angles:
At this point, I just want to show you the scrap pile that's been accumulating off to the side of my cutting mat. These are all of the leftovers from the strips I used in block #1. I'm showing this because you should start seeing a pile of your own beginning to form. The further I get in my block-making, the more I try to use scraps of already-cut strips. Down the road a bit, the longer strips will become scarcer, and therefore more valuable for the outermost logs of your blocks. Whenever possible, try to use the shortest scraps you can get away with to get the most mileage out of your strip piles.
OK, so I grabbed this red polka-dot strip from my scrap pile. It's one of my 1.5" strips. I roughly cut a piece to use on the right side of my center square ...
... and also a piece long enough to span across the top of the center square and first log, once they are sewn together:
Sew the first log to the center square and press your seam. Remember, I like to press toward the log that was just added:
Then trim your new piece to create a nice, clean, straight edge to which you'll sew the top log. You will notice that I continued the wonky angle that I created on that center square:
Attach the top log, press your seam ...
... and trim. You can see that I first trimmed the right side, to create that nice edge for your next log. I then made a cut to the top of the log, to add some more wonk. You might notice that the angle I chose to cut was partly to offset the downward sloping cut on the center square, to even out the block a little bit.
Oh, and see where the red fabric hangs over the block on the top left? It's not important to trim that right now:

Time to add your second round of logs. I chose a big, fat 3" scrap from my pile for this one. Roughly cut a piece big enough to sew on the right side, and another to span across the top of the block:
Attach & press the side log, then trim to create a straight edge for the top log. You can that I took an opportunity to create another angle here. Oh, and see that bottom edge where the blue gingham hangs past the bottom of the block? Again, it's not important to trim that edge for now, so feel free to leave it as-is:
Sew and press the top log to your block:
Wow, those sure are wide borders. Wider borders give you a lot of room to play with angled cuts. You can see the wonky cuts I made to this border below:
Getting the hang of it? Cut some strips for your next border ...
... sew and press your seams ... trim the top edge before adding the upper log ...
... sew, press, and trim. In this picture, you can again see how I try to maintain a little bit of equilibrium in my cuts and not let the angles get out of control. For example, the blue gingham log on the right was fatter at the bottom and skinnier at the top, so when I was trimming the green log, I angled it to be fatter at the top and skinnier at the bottom. Same thing on top: the blue log went from skinny on the left to wider on the right. When I cut the green log, I went for the opposite angle. It keeps the block in better balance, I think.
Add your fourth round of logs ...


... and your fifth, following the same basic techniques.

Oh, wait. What's that? What's that rotary cutter doing in this picture??!
I decided this was a good place to add a little bit of visual interest to my block. You can do this to any log that you choose. Make a nice angled cut in the middle of your log:
Pull a scrap that's big enough to fill in the gap that you just created. This scrap can be of a color or pattern that blends nicely into the log itself, or something with a high contrast -- that's up to you!
Create your new log from the three pieces by sewing them together and pressing the seams:
Then trim the new strip so that it has straight edges:
Attach this round of logs as you would any other. This is a GREAT trick for using scrap strips that aren't quite long enough to span the side of your block and get the most mileage out of your cut fabric. This adds instant length to any strip, and also adds a cool visual element to your final block.
I thought this was also a good time to trim out my edges and check my progress. Remember t
he overhangs that our logs were creating on the left and bottom sides of the block? Using your straight-edge ruler, trim them down following the original edges of your center block. As much as you might be tempted to do so, I've found that this is not a good time to make wonky, angled cuts:
Using your 12.5" square cutting ruler as a guide, check and see how close you are to your desired 12.5" block size. Looks like we have room for a few more rounds of logs:
That top, green dotted border seems too wide to me, so I first give it a trim and then got the pink strips ready for my next round of logs:
You know what to do next.
Here's another opportunity to add some visual interest. Not every round of logs has to be cut from the same fabric. In this next round, I decided to have my right-hand log and top log come from totally different prints. (I should mention at this point that you have the option of making your entire block this way. You can choose to use different prints for each and every log, like we did in block #1, instead of coordinating your side and top logs. Try them both and see which you prefer!)
Here's my next round, where I again added a small patch of a coordinated fabric across the top. I also made a small boo-boo here ... can you spot it?:
Yeah, I accidentally added the top log before adding the log on the right, which breaks the pattern that I had been following. Even though it was technically a mistake, you know what? I'm totally OK with it.
Another great opportunity to check your progress. See that right side? It's making me nervous that it's getting so close the edge when there's still a long way to go to get to the top. No big deal ...
... it just means it can stand a bit of a trim.
Here's my 9th round of logs, again trimmed to restore a little bit of balance, and also to make way for one final round of logs:
Looking pretty good. I just need to be sure to at least a 2-2.5" strip for my top log because of that wide space on the top right of the block. See it?:
This picture nicely shows how I keep that scrap pile nearby, and every time I make one of my trimming cuts, I toss the leftover strips into that pile:
OK, we should be good to go! Let's grab our 12.5" cutting ruler to trim up the block ...
Uh oh. Do you see what I see?
Aaargh! JUST shy on that bottom right corner. I can't stand having the block short of its intended size ... and my pet peeve is miniscule little borders that will get lost in the seam allowance, so adding a border to the right side is a less-than-ideal option here.
Let's test your comfort level with being wonky and improvisational. How would you handle this dilemma?
Well, let me tell you what I did. I just trimmed down that red gingham border to make room for a new final round of logs. I picked out a final print to add on to the block and finished it up.
Now there's enough block to trim down to 12.5":


And there you have it ... your wonky quarter log cabin block!
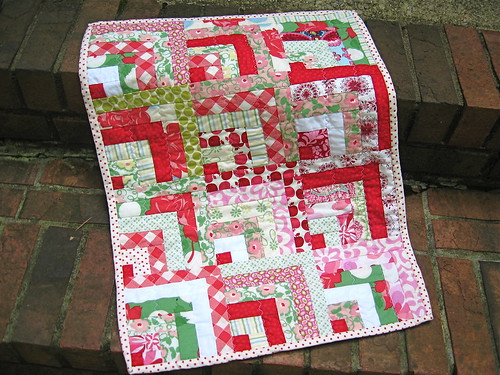
I mentioned earlier that I like this block because of its versatility. You can lay them out all facing the same direction, which I've seen referred to as "handkerchief corners", similar to this quilt:
Or you can group them together to create a larger, log-cabin style graphic:
Or, in true wonky style, you can mix it up and place them this way and that:
That last quilt also shows that you can sash these blocks, the same way we sashed blocks in our last tutorial.
So how'd you do? Are you starting to get the hang of it? If you make one of these block, I'd LOVE to see it!

Next up: wonky square-in-square blocks. See you then!