I know it's been a while since my last wonky block tutorial -- thanks for sticking with me. I hope you've all been having fun wonking away on your quilt blocks. Based on all of the great pictures in the Flickr pool, it looks like you've all really embraced the technique! I am blown away by both the awesomeness and the sheer quantity of quilts you guys are pulling together. Great job!
I wanted to be sure to wrap up the quilt-along with some resources on finishing your quilt. I was going to prepare a post with basting, quilting, and binding tips, but then realized this has already been done ... and done much better than I could ever hope to do it myself.
So, when you're finished making your wonky quilt blocks and are ready to begin assembling, be sure to refer to Dana's very thorough and easy-to-follow tutorials below:
How to assemble your quilt top
Free motion quilting tutorial
How to bind a quilt
Thanks again to all of you for your continued support and feedback throughout this quilt-along. It was tons of fun and, who knows?, I might be able to be convinced to do another one in the (maybe not so near) future!
Back again soon with some stuff I've been working on ... ... ...

Showing posts with label orbc quilt-along. Show all posts
Showing posts with label orbc quilt-along. Show all posts
Friday, October 23, 2009

Sunday, September 27, 2009
Quilt Along | 6. Wonky Bento Box-Style Block

Hello, friends!
I apologize that it's taken longer than expected to post this fourth and final block for the quilt-along. I really didn't know what to call this block, but it seems to me like a wonky version of the popular bento box block. I'm sure that many of you perceptive folks have already figured out that it's just four smaller quarter log cabin squares arranged in a "round-the-block"-type manner.
Let's get started, shall we? I'm sure you could have guessed by now that we always start with a square:

Add your first round of logs:


Cool. Now I can use my ruler to square up the block:


And, after those are sewn, pressed, and trimmed, add another round:

Don't forget to give your block some personality (aka "wonk" : ) by trimming at interesting angles:

Continue with a fourth round ...

... and a fifth:
This is likely a good time to trim up and see how you're faring. First, I trimmed up the sides:

Then, I didn't really like the point forming at the top right of the block ...

... so I trimmed the block again to even it out:

I used a 6.5" square cutting ruler to check my progress:

Cool. Now I can use my ruler to square up the block:


Ta-da! A nice & neat, trimmed-up 6.5" block:

Now make three more 6.5" blocks:

Arrange them in a way that's pleasing to your eye:

Sew two pairs of blocks together, and be sure to press the seams in opposing directions. For example, in the picture below, the seam that joins the top two blocks is pressed to the right, while the one joining the bottom two is pressed to the left:

Here's a picture of the back of the blocks at this point (just because I think y'all enjoyed seeing the block backs in previous posts):

Finally, join the block pairs together to get your 12.5" block:
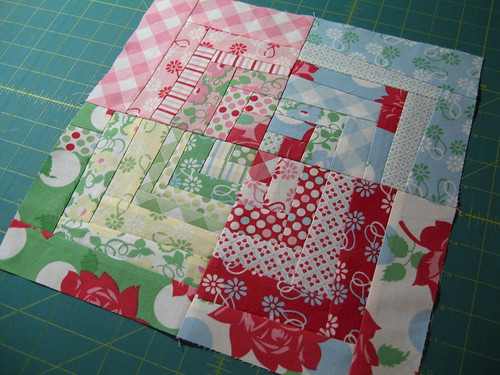
And there you have it!

This block takes just a little bit longer to make than the others, but I think that extra work is rewarded by the more complex look that it achieves. I am in love with its final effect and think that an entire quilt made from these blocks would be stunning.
Edited to add: Looking for a shortcut? You can always make a couple of larger wonky log cabin blocks, cut them into quarters, and rearrange them to achieve the same effect. Your block would have to be 13" square to yield four 6.5" quarter blocks. My only advice here is to make sure you start with a pretty large starting (center) square, so that it's not lost when cut up. Oh, and you also need to be careful to keep that center square fairly centered in the block.
I had intended to include this tip but forgot when writing the post. Thanks, Tami, for suggesting the idea in your comment and reminded me to come back and amend the tutorial!
Edited to add: Looking for a shortcut? You can always make a couple of larger wonky log cabin blocks, cut them into quarters, and rearrange them to achieve the same effect. Your block would have to be 13" square to yield four 6.5" quarter blocks. My only advice here is to make sure you start with a pretty large starting (center) square, so that it's not lost when cut up. Oh, and you also need to be careful to keep that center square fairly centered in the block.
I had intended to include this tip but forgot when writing the post. Thanks, Tami, for suggesting the idea in your comment and reminded me to come back and amend the tutorial!

So that's it! You're now armed with the information you need to make four different variations of the wonky log cabin block. Now the decisions are yours: how many blocks your quilt will be, and which style(s) you'll use. Most importantly, HAVE FUN!! I really can't wait to see what you come up with!

Don't forget to post your pictures to the Flickr pool. I'll check back in a few days with some reminders of wonderful resources for basting, quilting, and binding your quilt.
Tuesday, September 15, 2009
Quilt Along | 5. Wonky Squares-in-Squares Block
My streak of good luck has continued! I've won two more giveaways. First, I won a set of handmade Amy Butler tags from Kelly at I Have A Notion. Then, I won some half-yard cuts of my current favorite fabric line, "Good Folks" by Anna Maria Horner, from new quilt-along-er Joan at Wishes, True and Kind. Thanks so much, Kelly & Joan!
Wow, at this rate I should really go out and buy a lottery ticket.
And now, back to business : ) Welcome back for the third block variation in our quilt along. This version is our wonky square-in-square block. We will largely be using the steps from our first block variation, combined with some of the techniques introduced in the second. We will be constructing this block in much the same way that we made our wonky log cabin block, except that we will (mostly!) use the same fabric for each round of 4 logs. Make sense?
Since you are all now seasoned pros at wonky block making, I'm going to move a bit more quickly. Besides, I can tell by our Flickr pool that many of you have already figured this block out on your own!
First, as always, begin with a center square for your block. I started with a nice, fat 3" square this time, for no reason other than that I wanted to feature that rose design.
Since you are all now seasoned pros at wonky block making, I'm going to move a bit more quickly. Besides, I can tell by our Flickr pool that many of you have already figured this block out on your own!
First, as always, begin with a center square for your block. I started with a nice, fat 3" square this time, for no reason other than that I wanted to feature that rose design.

As with the other blocks, I shaved a bit off of some of the sides to start giving the block some of its interesting angles. This time, I cut on 3 of the sides. As usual, you can skew anywhere from 0 to 4 of the sides ... and as severely or as subtly as you'd like. Try it out a few different ways and see what feels the best for you.

Let me stop for a sec and point out that nifty little ruler that you see in the picture above. I know I mentioned at the start of this quilt along that the only tool I'd recommend is the 12.5" ruler. Well, a strong second suggestion would be a little ruler like this one. It's much more convenient to make small trims with it than with my larger, bulkier rulers.
Next, plan your first round of logs. When I make these blocks, I usually like to make my first log from a different fabric than the next three. I don't know why, but I suspect it's because I saw Denyse Schmidt do something like that in her blocks. Of course, this is completely optional ... but consider adding a "random" log somewhere in your block, if not in your first round than maybe in a later round. Try it out in the same pattern as your other logs but in a different color, or from a different pattern in the same color. It'll be cool ... I promise.

Sew, press, and trim, as you might expect.

Here's the block with its first set of logs attached:

You might notice that I added thinner strips on the bottom and right side, and wider strips on the top and left. Alternating your strip sizes is a nice way to offset the block's center and keep that middle square moving throughout the block. This is a great time to point you to a wonderful post about some tricks to making effective wonky blocks ... check out Jenny's post on her blempgorf blog.
You know what comes next ...

Wonk!
I went pretty severe on this one ... by my standards, anyway.
Proceed to adding your second set of logs. You can see here that I followed Jenny's advice and used thinner strips on bottom and right side this time, to balance the block out and move the center back closer to ... well, to the center:

With another round of logs attached, it is again time to make some cuts and give your block some more interesting angles:

On to your third round of logs.
In this round, I decided to use a technique that I introduced in the quarter log cabin tutorial -- the pieced log:

And here's my block so far with everything sewn, pressed and trimmed:

Now is a good time to do a progress-check, using your 12.5" ruler as your guide:

So here's what I determined about my block at this point: it's looking far too rectangular, taller than it is wide. Keep an eye out for some common pitfalls, like blocks becoming rectangular, a corner becoming way too pointy, the center sqaure being pushed too far to one side, or the block taking on the shape of a parallelogram.
Not a problem, I'll just make some more trims:

Much better.
Time for your fourth round of logs. Here's another technique you may (or may not) want to try. Square-in-square blocks are built off the premise of using the same fabric for each round of logs. But who said you always have to follow that rule? Isn't the first rule of wonky block making that there are no rules?
For my block, I decided to use one fabric for the bottom (first) log, switch to a different pattern for the next two logs, and finish out the round with the same fabric as the first.
After sewing, pressing, and trimming, it's time for another check:

Errrrr ... and now you know why I recommend this step. First, it helped me to see that I should be good to go with just one more round of logs. (And, as I mentioned in my last post, you don't always have to use 3" strips for your outer borders. My ruler helped me to see that I can use 2" and 2.5" strips for my outer borders, and still have plenty of room to trim). Also, in this instance, it helped me see that my bottom left corner was sticking way too far out.
Time for some more trims. I trimmed up the bottom and left side to reduce the angle of that corner, and help to keep it closer to square:

Did you notice me practicing one of my earlier tips, too? Look at the left side of my block. See how the yellow log went from skinny at the top to wider at the bottom? I wanted my trim of the pink rose log to offset that angle and balance it out a bit, so I cut that strip to be wider at the top and skinny at the bottom.
How's it looking now?:

Another judgment call. Not enough wonk -- it's looking a little too square. A little more off of the top and right side. You can see the skinny/wide trick again on the right:

Add the first two strips of your final round of logs. You can see that I started improvising from my scrap pile, since I was running short of that outer border fabric. I pieced my first (bottom) log with some coordinating prints:

After another gut check, I added the third and fourth logs. Here's my block before my final trim:

To be frank, I wasn't too thrilled with how that bottom border turned out, so I leveraged my final cut to trim that log down:

And voila! There you have it, the wonky square-in-square block.

If I could change anything about this block, I think I would have added a solid or two. I think, moreso than the other three block variations, this block design really pops with the use of some solids -- I suspect it's because it makes it easier for your eye to discern the square-in-square shape. That seems to get lost a bit when using all prints.
Well, every block can't be a star ... some have to play supporting roles in your quilt, too!

As always, I'd love to hear your feedback. I can't wait to see some of your wonky square-in-square blocks pop up in the Flickr pool. One more block to go, and then it's up to you to figure out how you want to use them in your final quilt design.
Have fun!
Monday, September 7, 2009
Quilt Along | 4. Wonky Quarter Log Cabin Block
Happy Labor Day, everyone!
Thank you all so much for the wonderful feedback you've been leaving me on my last tutorial. I am so glad to hear that I've been able to help so many new quilters (and even some older, but new-to-wonky quilters!) get started on this new project. I've even heard from some of the more experienced quilters that I was able to offer a few new tips, which is great. It's been so much fun seeing all of the blocks you've been creating, and I really hope you're enjoying yourself in the process.
Before moving on to today's tutorial, I wanted to take care of a few pieces of business.
Members of the ORBC group on Flickr have been asking some really great questions about this round of the quilt along. Rather than re-posting them all here, I'll just point you to the Frequently Asked Questions thread. There, you'll find a running list of all of the questions that have been asked and my attempts at answering them.
There are, however, two points of clarification that I want to call out here.
First, nanotchka correctly pointed out that we won't have nearly enough 3" strips to use them as the outer borders of all of our blocks. (I'm not talking about the sashing strips -- I am talking of the outermost border of logs on the block itself.) Each block would require four 3" strips, and a 5 x 5 layout would need 100 strips. We certainly didn't cut that many! I should have clarified that I used 3" strips as the outer borders for the first block, because it most clearly illustrated the technique that I was describing. However, as every block will be different, some might not need the full 3" strip as the outer border. As you become more comfortable with the technique, you will begin to recognize where you can get away with using a 2.5" strip or even a 2" strip as the outer border.
You can also begin to introduce pieced strips to make longer usable strips out of too-short ones, a technique I'll be introducing in this post.
Second, I also want to comment on fabric requirements for the quilt along. Originally, I had recommended a minimum of 16 fat quarters to make a 25-block quilt. Admittedly, this was purely an estimate based on what I thought was some logical reasoning. nanotchka made a full quilt based on my last tutorial over the last few days and reported back to me that it took nearly 26 fat quarters to make her entire quilt, with very few scraps left over. It looks like I may have underestimated the amount of fabric that the quilt would take. So, if you're planning on making the full quilt, you may want to think about adding a few more fabrics into the mix. Of course, you can always wait to see how far you get before you start to run short, but I wanted you to be aware for planning purposes. Sorry about that!
Finally, I made the block from the first tutorial into an adorable little quilted pillow for my giveaway winner. Let me tell you, I had a hard time convincing Mrs. Quilt Dad that this was already promised to one of my blog readers!

I tried something new on this one: a quick binding sewn on to the edge of the back flap. I think it adds a nice little detail to the back of the pillow!

Nichole said...


The random number generator picked #46, and the winner of the pillow is Nichole, who said:
Thanks for the great step by step with photos; it really helps make everything clear. I am working on some Christmas/winter wonky blocks - will post pics tomorrow. my flickr is partridgepeartree. Thanks for the giveaway, John!
Congrats, Nichole! I'll Flickrmail you for your mailing information.
OK, are your ready for the second block variation? It's what I call the "wonky quarter log cabin" block because ... well, because it's basically like one quarter of a full log cabin block! I think this has become my favorite of the four variations, because of its versatility. At the end of the post, I'll show some different ways to lay this block out for some really cool design effects.
I am confident that as we move from block to block, you'll start to get the hang of the technique (which is mostly the same, regardless of the block variation) and won't really need much of my explanation..
For this block, I started with a 2" block, cut from one of my 2" strips. Again, this starting block can be any size of your choosing. 2" sounded like a good place to start for me:
I gave a little subtle wonk to two sides of the center square by using my ruler and rotary cutter to cut some angles:
At this point, I just want to show you the scrap pile that's been accumulating off to the side of my cutting mat. These are all of the leftovers from the strips I used in block #1. I'm showing this because you should start seeing a pile of your own beginning to form. The further I get in my block-making, the more I try to use scraps of already-cut strips. Down the road a bit, the longer strips will become scarcer, and therefore more valuable for the outermost logs of your blocks. Whenever possible, try to use the shortest scraps you can get away with to get the most mileage out of your strip piles.
OK, so I grabbed this red polka-dot strip from my scrap pile. It's one of my 1.5" strips. I roughly cut a piece to use on the right side of my center square ...
... and also a piece long enough to span across the top of the center square and first log, once they are sewn together:
Sew the first log to the center square and press your seam. Remember, I like to press toward the log that was just added:
Then trim your new piece to create a nice, clean, straight edge to which you'll sew the top log. You will notice that I continued the wonky angle that I created on that center square:
Attach the top log, press your seam ...
... and trim. You can see that I first trimmed the right side, to create that nice edge for your next log. I then made a cut to the top of the log, to add some more wonk. You might notice that the angle I chose to cut was partly to offset the downward sloping cut on the center square, to even out the block a little bit.
Oh, and see where the red fabric hangs over the block on the top left? It's not important to trim that right now:
Time to add your second round of logs. I chose a big, fat 3" scrap from my pile for this one. Roughly cut a piece big enough to sew on the right side, and another to span across the top of the block:
Attach & press the side log, then trim to create a straight edge for the top log. You can that I took an opportunity to create another angle here. Oh, and see that bottom edge where the blue gingham hangs past the bottom of the block? Again, it's not important to trim that edge for now, so feel free to leave it as-is:
Sew and press the top log to your block:
Wow, those sure are wide borders. Wider borders give you a lot of room to play with angled cuts. You can see the wonky cuts I made to this border below:
Getting the hang of it? Cut some strips for your next border ...
... sew and press your seams ... trim the top edge before adding the upper log ...
... sew, press, and trim. In this picture, you can again see how I try to maintain a little bit of equilibrium in my cuts and not let the angles get out of control. For example, the blue gingham log on the right was fatter at the bottom and skinnier at the top, so when I was trimming the green log, I angled it to be fatter at the top and skinnier at the bottom. Same thing on top: the blue log went from skinny on the left to wider on the right. When I cut the green log, I went for the opposite angle. It keeps the block in better balance, I think.
Add your fourth round of logs ...
... and your fifth, following the same basic techniques.
Oh, wait. What's that? What's that rotary cutter doing in this picture??!
I decided this was a good place to add a little bit of visual interest to my block. You can do this to any log that you choose. Make a nice angled cut in the middle of your log:
Pull a scrap that's big enough to fill in the gap that you just created. This scrap can be of a color or pattern that blends nicely into the log itself, or something with a high contrast -- that's up to you!
Create your new log from the three pieces by sewing them together and pressing the seams:
Then trim the new strip so that it has straight edges:
Attach this round of logs as you would any other. This is a GREAT trick for using scrap strips that aren't quite long enough to span the side of your block and get the most mileage out of your cut fabric. This adds instant length to any strip, and also adds a cool visual element to your final block.
I thought this was also a good time to trim out my edges and check my progress. Remember t
he overhangs that our logs were creating on the left and bottom sides of the block? Using your straight-edge ruler, trim them down following the original edges of your center block. As much as you might be tempted to do so, I've found that this is not a good time to make wonky, angled cuts:
Using your 12.5" square cutting ruler as a guide, check and see how close you are to your desired 12.5" block size. Looks like we have room for a few more rounds of logs:
That top, green dotted border seems too wide to me, so I first give it a trim and then got the pink strips ready for my next round of logs:
You know what to do next.
Here's another opportunity to add some visual interest. Not every round of logs has to be cut from the same fabric. In this next round, I decided to have my right-hand log and top log come from totally different prints. (I should mention at this point that you have the option of making your entire block this way. You can choose to use different prints for each and every log, like we did in block #1, instead of coordinating your side and top logs. Try them both and see which you prefer!)
Here's my next round, where I again added a small patch of a coordinated fabric across the top. I also made a small boo-boo here ... can you spot it?:
Yeah, I accidentally added the top log before adding the log on the right, which breaks the pattern that I had been following. Even though it was technically a mistake, you know what? I'm totally OK with it.
Another great opportunity to check your progress. See that right side? It's making me nervous that it's getting so close the edge when there's still a long way to go to get to the top. No big deal ...
... it just means it can stand a bit of a trim.
Here's my 9th round of logs, again trimmed to restore a little bit of balance, and also to make way for one final round of logs:
Looking pretty good. I just need to be sure to at least a 2-2.5" strip for my top log because of that wide space on the top right of the block. See it?:
This picture nicely shows how I keep that scrap pile nearby, and every time I make one of my trimming cuts, I toss the leftover strips into that pile:
OK, we should be good to go! Let's grab our 12.5" cutting ruler to trim up the block ...
Uh oh. Do you see what I see?
Aaargh! JUST shy on that bottom right corner. I can't stand having the block short of its intended size ... and my pet peeve is miniscule little borders that will get lost in the seam allowance, so adding a border to the right side is a less-than-ideal option here.
Let's test your comfort level with being wonky and improvisational. How would you handle this dilemma?
Well, let me tell you what I did. I just trimmed down that red gingham border to make room for a new final round of logs. I picked out a final print to add on to the block and finished it up.
Now there's enough block to trim down to 12.5":
And there you have it ... your wonky quarter log cabin block!
I mentioned earlier that I like this block because of its versatility. You can lay them out all facing the same direction, which I've seen referred to as "handkerchief corners", similar to this quilt:
Or you can group them together to create a larger, log-cabin style graphic:
Or, in true wonky style, you can mix it up and place them this way and that:
That last quilt also shows that you can sash these blocks, the same way we sashed blocks in our last tutorial.
So how'd you do? Are you starting to get the hang of it? If you make one of these block, I'd LOVE to see it!
Next up: wonky square-in-square blocks. See you then!
Subscribe to:
Posts (Atom)